Relationships, exercise, career, and spirituality are just as important to your health as the food you eat. Health Coaches understand this and take a holistic approach to supporting the whole person. Find out how health coaching stacks up against other health and wellness jobs.
Changing lives in the Southlake, Colleyville and Keller area
(469) 293-8177
info@selftheory.com
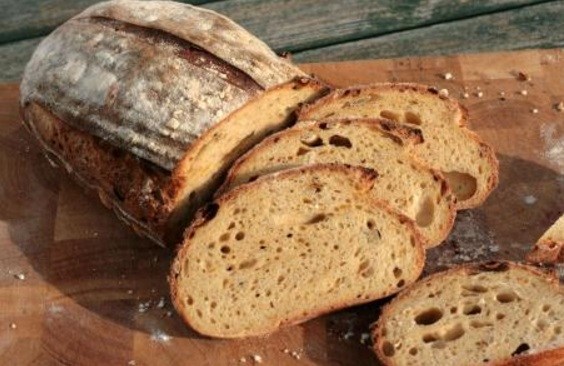
Traditional Fermented Sourdough Bread
Prep Time
36 Hours (Feed, Whisk, Rise and Bake)
Prep Notes
When your sourdough culture is not in use, it can be stored in the refrigerator. Make sure you don't forget about in there. For best results, your culture should be pulled out every couple weeks and fed. Before you begin to Sourdough Bread making, make sure that the culture is live and active.
Storing my culture
As a best practice, I prefer to store my culture in a half gallon mason jar. Every month, I typically pour my culture into a clean jar, so a clean environment for the culture is maintained.
How do I feed my culture?
Pull your culture out of the refrigerator and allow to sit on the counter for a few hours at room temperature. Once your culture has set to room temperature, you are ready to feed it.
How much should I feed my culture?
Your culture will always be fed a combination of filtered water and flour. As a good rule of thumb, you will always feed your culture half of what it weighs. For example:
1 cup (8 oz.) of culture = feed it 1/2 cup (4 oz.) of flour + 1/2 (4 oz.) of water
Your culture should be fed around 2-3 times. The key is making sure that your culture is bubbly and rising with each and every feed that you provide it. Each time you feed your culture, it will grow. Feeding measurements should be altered accordingly. In other words, as your culture is fed, it will grow. This means you must feed it more food. So on the second feed, if your culture is now 2 cups (16 oz.), you would then feed it 1 cup (8 oz.) of flour + 1 cup (8 oz.) of water. Remember, the amount you feed your culture will grow as it grows.
How will I know that I am ready to start bread making?
Your culture will have most likely doubled in size and start to look very bubbly and active.
Recommended tools
1 Danish whisk (this can be purchased on Amazon)
Dutch Oven - Artisian Loaf of Break
Cast Iron Loaf Pan
You will also need a proofing basket or an oval sized bowl to use.
Large dish towel. Try to use a dish towel that is smooth and doesn't give off lent or fuzzy material into your bread.
Electric Bread Knife
Cooking Time
25- 30 minutes
Yields
1 loaf of bread
Ingredients
1 cup of (active/bubbly) sourdough starter
1 cup of filtered water
1 TBSP of unrefined sea salt (we prefer pink Himalayan sea salt)
3-4 cups of organic unbleached all-purpose white flour
Directions
Start adding in flour about 3/4 of cup at a time. Mix very well to ensure all the clumps are well dissolved and smooth.
You will continue the process of slowly adding in flour until you reach a point that your dough starts to become thick and tough.
Once you can no longer move your whisk around in the dough, you now know it is time to start the kneading process.
Continue to add flour at this point. I would only recommend no more than a 1/4 a cup.
The kneading process is good therapy. Ha! You will create a fist with both hands and start to making punching motions down onto the dough. As you do this, you will continue adding 1/4 a cup of flour at a time. You will do this until the dough is firm like a soft ball. You no longer want the dough to be sticky. Be sure you knead out any clumps. You can stretch the dough apart to ensure that all the clumps and sticky sections of the dough are eliminated.
Once you are done, your dough is ready to be formed in a ball and set aside for a 12 hour rise process. For simplicity, is okay to leave the dough in the original bowl that you mixed it in. Typically it is best to leave the dough undisturbed in place like the dark oven (just make sure your oven temperature is off and there is no light on). Fermented foods typically function best when left in a dark and warm space.
After 12 hours, your ball shaped dough will have doubled in size. With a dough scraper, you will pull the dough out and place it on a lightly floured surface.
Shape the dough in to the round flat disc. Carefully fold and stretch the sides of the dough in towards the middle about 4 times. You will gently shape the dough into another ball. In this process, avoid disturbing the dough too much or kneading it.
Lay a dish towel in an oval sized bowl or proofing basket. Place the ball of dough into the bowl or basket and fold the edges of the towel up to cover dough. Set it back into the dark oven for 2 more hours for second rise.
When ready, pull the bread out of the dark oven and begin to preheat the oven to 450 degrees.
Gently place the dough into the dutch oven or loaf pan and cover.
Once oven is fully heated, place it directly into the oven and bake for 25 minutes. After 25 minutes, you will uncover the bread and let it bake for an additional 5-10 minutes. If you like your bread crispy, you can bake it a few minutes longer.
Remove the bread from the oven. While it might be tempting to tear into the bread and eat it, it is important you allow it to cool for an hour before slicing. The bread could have a doughy center if sliced to quickly. It will continue to bake when it is pulled out.